How to Read a Dig Result: A Guide for Network Novices

Dig, short for Domain Information Groper, is a powerful command-line tool used for querying DNS (Domain Name System) servers. It provides detailed information about domain names, IP addresses, and DNS records.
In this article, we'll explore how to run a dig command and, more importantly, how to read and interpret the results. We will also explore using Globalping to run dig from anywhere worldwide.
What is Dig?
Dig is a versatile tool that helps you retrieve DNS information for a specific domain. Whether you're looking for the IP address associated with a domain, querying different types of DNS records, or investigating the authoritative DNS servers for a domain, dig has you covered.
Are you new to DNS? Check out our blog post, What is a DNS Record, and Which Ones Are There? to learn the basics!
Running a Dig Command
The basic syntax for running a dig command is as follows:
dig [options] [domain]
- `domain`: This is the domain name you want to query.
- `options`: You can use optional parameters to customize your dig command, such as specifying the type of DNS record to query or choosing a specific DNS server.
Note: Windows does not have the dig command by default. Alternatively, you can use nslookup or Resolve-DnsName (in PowerShell). It's important to note that the result from these Windows system commands looks different from the examples provided in this guide, demonstrating the command's usage on a Linux machine.
Example: Running Dig to Query A Records for jsdelivr.com
Let's say you want to query the A records (Address records) for the domain "jsdelivr.com." You can do this by running the following dig command:
dig jsdelivr.com A
Understanding Dig Results
Interpreting dig results may seem complex at first, but breaking it down step by step makes it more manageable. Here are the key components you'll encounter in a typical dig result:
- Header Section: The header section provides information about the dig query, including the query time, the server used, and flags.
- Question Section: The question section displays the domain, and the type of record queried.
- Answer Section: The answer section contains the information retrieved from the DNS server, such as IP addresses or other DNS records.
- Authority Section: The authority section lists the authoritative DNS servers for the queried domain.
- Additional Section: The additional section includes any other information provided by the DNS server, such as IP addresses of authoritative servers.
Example: Reading Dig Results for jsdelivr.com
Here's an example of a dig result for "jsdelivr.com":
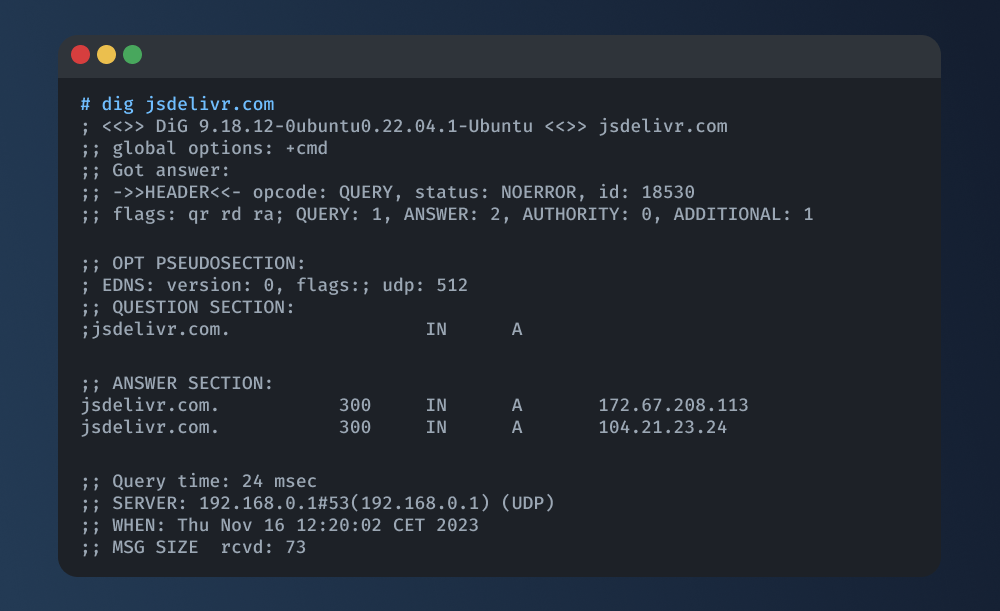
In this example:
- The "QUESTION SECTION" indicates that the query was for A records of "jsdelivr.com."
- The "ANSWER SECTION" provides the IP addresses associated with the domain: 104.21.23.24 and 172.67.208.113.
By understanding these sections, you can extract valuable information about the queried domain from the dig result.
Gaining Global Insights with Globalping and Dig
Globalping is a free network testing platform enabling you to run common measurement commands like ping, traceroute, or dig from anywhere.
How to Use Globalping for Dig
Using dig with Globalping is almost identical to what you've learned in this guide. The significant difference is, that the command name is different:
- use
dnsinstead ofdig!
To get started, get your preferred Globalping integration. For this guide, we'll be using the CLI tool, but we also have a Slack app, web form, and Github bot available that work basically the same.
To install the CLI, follow the instructions to our GitHub repo.
Ready? Then, let's write our first command!
In your terminal, write and run the following command to run dig from a specific location, such as Vienna:
globalping dns jsdelivr.com --from Vienna
In this command:
- Replace "jsdelivr.com" with the domain you want to query.
- Modify the location ("Vienna" in this case) to specify the origin of the dig command.
The result should look similar to the dig output we examined earlier in this guide:

If you want to learn more about the dns command and what options you can use with Globalping, run globalping dns --help or check out our documentation.
Using Dig Effectively
Dig is a versatile tool, and here are some tips for using it effectively:
- Specify Record Type: Use the -t option to specify the type of DNS record you want to query (e.g., A, MX, NS). For example:
dig -t MX example.com - Query Specific DNS Servers: Use the @ symbol followed by the IP address of a DNS server to query a specific server. For example:
dig @8.8.8.8 example.com - Reverse DNS Lookup: Perform reverse DNS lookups using -x and the IP address to query. For example:
dig -x 123.456.789.3 - Limit Response: Often, you are not interested in reviewing the entire response. Luckily, you can “turn off” sections as needed; for example this command will only show you the answer section:
dig example.com +nocomments +noquestion +noauthority +noadditional +nostats
Conclusion
Whether you find yourself troubleshooting DNS issues, validating DNS configurations, or merely delving into the intricacies of the DNS landscape, dig offers a valuable tool for gaining comprehensive insights into the DNS records and configurations of your target domain.
For a global perspective, consider using Globalping to run dig from anywhere in the world. Why not give Globalping a try and see for yourself?