How to Read Ping Results: A Beginner's Guide

Ping is one of the most fundamental tools in a network engineer's toolkit. It's like the "Hello World" of networking, allowing you to test the basic connectivity between your device and another on the network. Whether you're a seasoned network pro or just dipping your toes into the world of networking, understanding how to read ping results is an essential skill.
In this blog post, we'll walk you through running a ping command, deciphering the results, and even introduce you to a handy tool called Globalping that lets you ping from anywhere in the world.
What is Ping?
Ping is a simple yet powerful network utility that sends a small packet of data to a target device and waits for a response. The response time, or latency, helps you gauge the speed and reliability of your network connection. It's like shouting "Are you there?" into the network and listening for an "I'm here!" return.
Running a Ping Command
Before reading ping results, let's learn how to run a ping command. The process is similar on most operating systems, including Linux, macOS, and Windows.
Basic Ping Syntax
The basic syntax for running a ping command is:
ping [options] target
target: This is the hostname or IP address of the device you want to ping. It can be a website, a server, or any other device on the network.options: These are additional parameters to customize your ping command. For example, you can set the number of ping requests, adjust the packet size, or specify a timeout period.
Example: Pinging a Website
Let's say you want to ping the jsdelivr website. You would run the following command:
ping jsdelivr.com
This sends a series of ping requests to the website's servers and displays the results.
Now that you know how to run a ping command, let's decipher the results.
Understanding Ping Results
You'll see a series of lines in the output when you run a ping command.
The following example shows our results for running the command ping jsdelivr.com on Ubuntu:
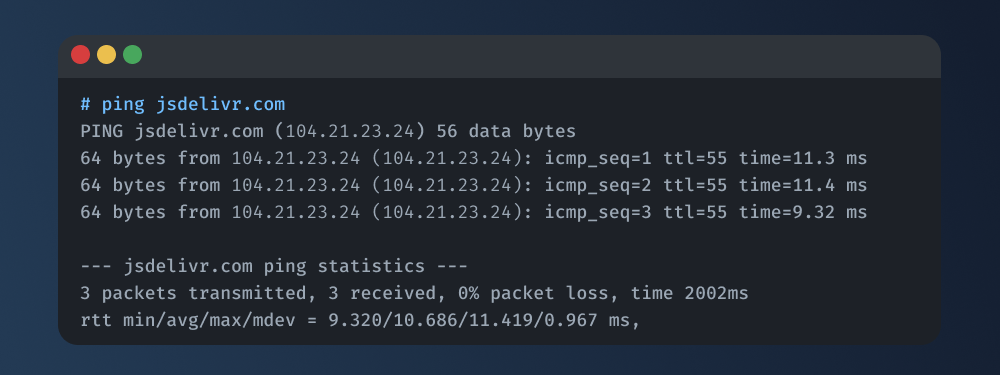
Let's break down this output step by step:
- Destination IP Address or Hostname: The first line typically shows the IP address or hostname of the target device.
- Packet Size: At the end of the first line, you can read the size of each ICMP (Internet Control Message Protocol) packet sent. In this case, the packet size is 56 bytes.
- Ping Responses: The following lines represent the responses received from the target device. Let's analyze one of them in detail:
- 64 bytes from IP_ADDRESS: This part confirms that we received a response from the target as a 64-byte packet.
- icmp_seq: This is the sequence number of the ping packet. It starts at 0 and increments with each new packet sent.
- ttl: TTL, or Time-to-Live, is the number of hops (routers) the packet traveled through before reaching the destination. This number can help you understand the network's complexity and identify potential bottlenecks.
- time: The most crucial part of the response is the round-trip time (RTT), measured in milliseconds. It tells us how long it took for the packet to travel from our computer to the destination and back.
At the end of the result, you'll see a summary including the following data:
-
Packet Loss: This indicates the percentage of packets lost. If you see non-zero packet loss, it shows some packets didn't make it, suggesting potential network issues.
-
Round-Trip Time (RTT): This shows the time it takes for a packet to travel from your computer to the target device and back. These values indicate the speed and stability of your network connection. Lower RTT values are generally better, but occasional fluctuations are normal. You'll see four values:
- Minimum: The shortest time recorded.
- Average: The average time over all ping requests.
- Maximum: The longest time recorded.
- Mean Deviation: The spread of RTT values. ****
Using Globalping: Ping from Anywhere in the World
Now that you're familiar with how to run a basic ping command and interpret the results let's introduce you to a handy tool called Globalping. It's a great resource for network enthusiasts; the best part is that it's free!,
Globalping allows you to run ping tests from virtually any location worldwide. This is incredibly useful if you want to check how your network performs in different regions. Whether you're troubleshooting network issues or testing the latency of a server in a remote location, Globalping has you covered.
How to Use Globalping
Utilizing Globalping is a breeze, especially when you harness the power of its Command Line Interface (CLI) tool. To get started, head to our GitHub page and follow the instructions for setting up the CLI tool on your machine.
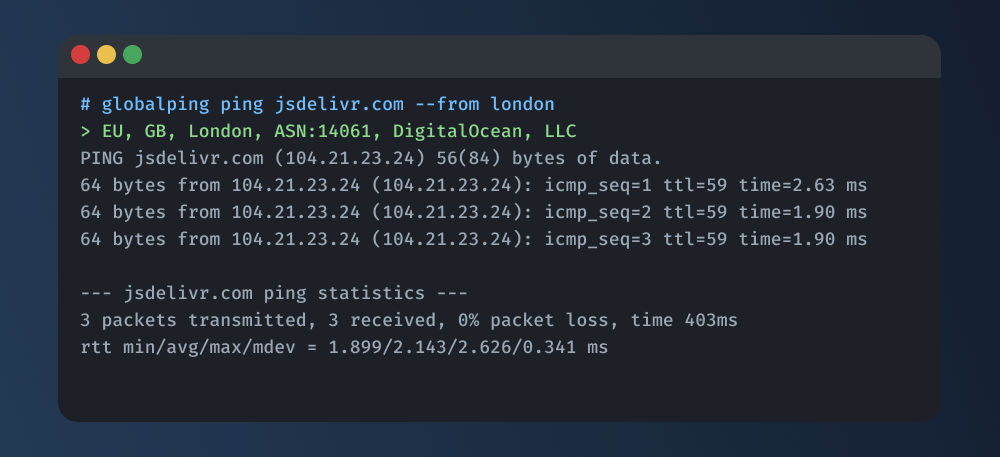
Once you've successfully set up the CLI tool, you can write your first ping command. Open your terminal and type the following command to initiate a ping from a specific location, let's say London:
globalping ping jsdelivr.com --from London
In this command:
- Replace "jsdelivr.com" with the domain or IP address you want to ping.
- Modify the location ("London" in this case) to specify where you want the ping to originate.
The result you receive closely resembles the familiar ping results we've explored earlier in this article. In addition, it includes essential information about the Globalping probe on which the command was executed.
Globalping offers a wealth of additional features and customization options. You can take your network diagnostics to the next level by pinging from multiple locations simultaneously or adjusting the number of packets sent per ping. To explore these advanced capabilities, dive into our documentation!
Conclusion
Understanding how to read ping results is fundamental for anyone working with networks. By running ping commands and interpreting the results, you can diagnose network issues, assess latency, and ensure the smooth operation of your systems.
And with Globalping, you have the added benefit of testing network performance from anywhere globally, all for free. So, whether you're troubleshooting network problems or just curious about your network's performance, give it a try.